Reaper DAW: Why It’s (Almost) Perfect For Modern Metal
Nail The Mix Staff
Reaper is the definition of a “no-nonsense” DAW. It’s built by a small team with a single focus: performance, stability, and flexibility. It’s the “if you know, you know” tool that more and more metal producers are using, and for good reason.
The reason it’s so popular in our world is simple: it doesn’t choke on the massive track counts and heavy plugin chains that modern metal requires. Think quad-tracked guitars, each with a CPU-hungry amp sim, layered drum samples, and dense orchestral parts- Reaper just handles it. It’s a lean, powerful, and unopinionated tool that trusts you to build your own workflow.

And for those who like to tinker, it provides almost limitless options to customize it with themes, and build crazy powerful automated workflows with ReaScript and SWS/S&M Extension.
But it’s not for everyone. It’s not flashy, it doesn’t come with a 50GB library of sampled violas, and it won’t hold your hand.
So is Reaper right for you? Here’s the TLDR version:
- Best for: The technically-minded, self-sufficient home studio producer who wants ultimate control, stability, and a crazy-low price.
- Not ideal for: Producers who need to constantly send full project files to big commercial studios that run on Pro Tools.
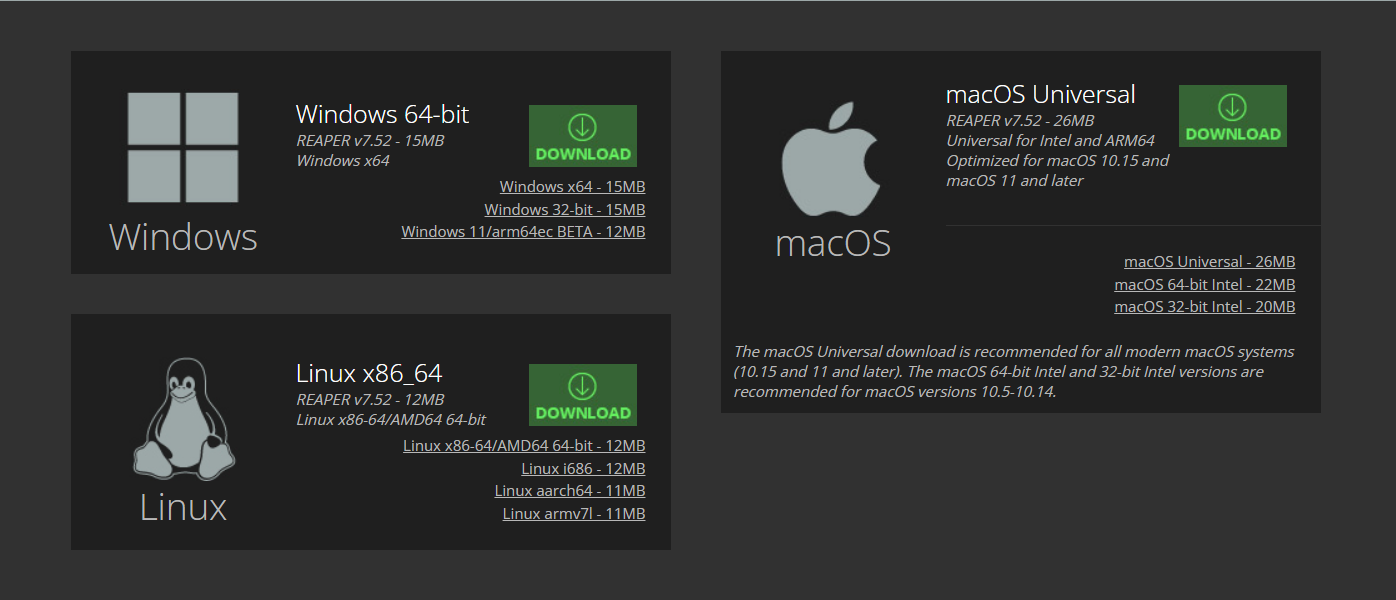
- Platforms: Windows · macOS · Linux
- Trial: 60-day, 100% full-featured trial. No disabled features, just a 5-second reminder screen after the 60 days are up. (link to pricing page)
Quick Spec Table
| Spec | Details |
| OS support | Windows (XP – 11), macOS (10.5 – 15), Linux (Dedicated builds) |
| Apple Silicon | Yes, fully native builds available. |
| Linux builds | Yes, native builds for various distros. |
| Evaluation / trial | 60-day, fully-functional, non-crippled trial. |
| License types | $60 Discounted: (Personal use / or commercial if revenue < $20k/yr). $225 Commercial: (Commercial use if revenue > $20k/yr). Both licenses give you the exact same software. |
| Plugin formats | VST, VST3, AU (macOS), JSFX, DX (Windows). |
| Install size / portable | Famously tiny (often under 70MB). Can be run as a “portable” install from a USB drive. |
How much does Reaper cost?
First things first: Reaper is not free. The reason so many people think it is (and let’s be honest, why so many people abuse the trial) is because of its incredibly generous, trust-based trial.
Here’s how it works:
- The Trial: You can download and use a 100% full-featured, non-crippled version of Reaper for a 60-day evaluation period. There are no watermarks, no disabled features, nothing.
- After 60 Days: The only thing that happens is a 5-second reminder screen (the “nag screen”) pops up when you launch the app. You can just click “Still Evaluating…” and the app will open and continue to work perfectly.
A lot of people just… keep clicking that button. Forever. Don’t be that person. The app is amazing and cheap.
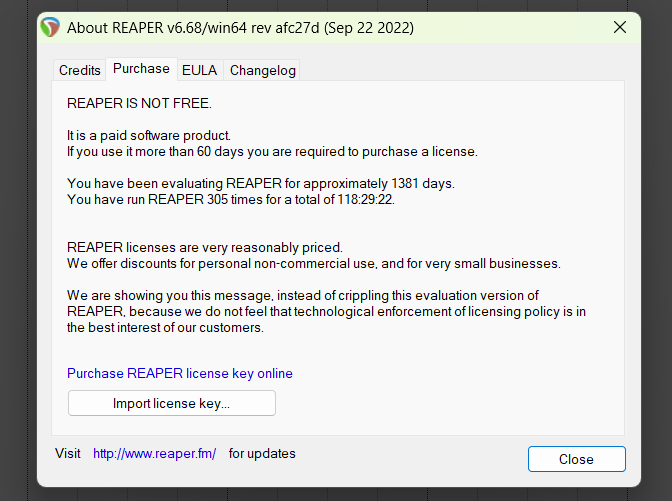
The Real Price (It’s a one-time fee):
- $60 Discounted License: This is for personal use, educational institutions, non-profits, OR for commercial use if your annual gross revenue from audio work is less than $20,000 USD. This covers 99% of home studio producers.
- $225 Commercial License: This is for individuals or businesses making over $20,000 USD per year with audio.
Both licenses get you the exact same, fully-featured software. A single license is good for all updates through two full version numbers (e.g., a 7.x license is good all the way through version 8.99), which usually lasts for years. It’s the best deal in pro audio, period.
👉 See full details on Reaper pricing
Download & System Requirements
The install file is tiny—seriously, it’s smaller than most of your drum samples. It’s famous for running smoothly even on older or less powerful computers.
Windows
- OS version: Windows XP – 11 (32-bit and 64-bit)
- CPU / RAM: Will run on almost anything, but for metal, you’ll want a modern multi-core CPU and 16GB+ RAM.
- Storage: < 100MB for the app.
- Notes: You’ll need a good ASIO driver for your audio interface.
macOS
- Versions supported: macOS 10.5 – 15
- Apple Silicon: Yes, fully native (and it flies).
- Storage / RAM: < 100MB for the app. 16GB+ RAM is recommended for big projects.
Linux
- Distros / package notes: Native builds are available, which is rare and awesome.
- Plugin formats: VST, VST3, and LV2 support.
- Quirks: Can require a bit more setup depending on your distro, but it’s a first-class citizen in the REAPER world.
Strengths for Metal
Insane CPU Efficiency & Stability: This is its #1 feature. You can run massive sessions with dozens of amp sims (like Neural DSP) and spectral processors (like Soothe2) across multiple busses withoutyour computer catching fire. This lets you focus on creativity, not on freezing tracks or worrying about the problem with modern metal guitar tone.
Surgical, “Sample-Accurate” Editing: The editing workflow is perfect for the precision that metal demands. Tools like Dynamic Split for drums and Stretch Markers for guitars let you create machine-tight performances with phase-coherent edits.
Infinitely Flexible Routing: This is a game-changer. Any track can be a folder, a bus, a send, or receive audio/MIDI. Creating complex drum busses or quad-tracked guitar busses is as simple as making a “folder” track—no separate bus tracks needed.
Item-Based FX (“Take FX”): You can drag a plugin (or a whole FX chain) directly onto an audio clip, not just the whole track. This is invaluable.
- Need to gate just one noisy tom hit? Drop ReaGate on that single item.
- Want to add a delay throw to one word in a vocal? Drop a delay on that one item.
- Need to trigger a sample for one weak kick hit? Drop Slate Trigger on that single item.
SUPER deep customization: REAPER can be molded into anything. It supports hundreds of user-created themes, so you can change it look just like Pro Tools or Cubase. More importantly, you can build Custom Actions (macros) to automate any repetitive task, like building a full quad-track guitar bus with one keypress. This “cognitive offloading” saves you thousands of clicks and keeps you in the creative zone.

Weaknesses / Tradeoffs
Harder to collaborate and share sessions (The “Loan Wolf” factor): This is the big one. REAPER is not the industry standard. You can’t send your .RPP project file to a big-shot mix engineer who only uses Pro Tools. You’ll have to print and send audio “stems,” which kills their ability to make deeper tweaks.
The learning curve can be steep: Out of the box, REAPER can feel plain or even ugly. It doesn’t “hold your hand”. You must be willing to spend some initial time setting it up: finding a theme you like, installing the SWS extension, and building your custom actions.
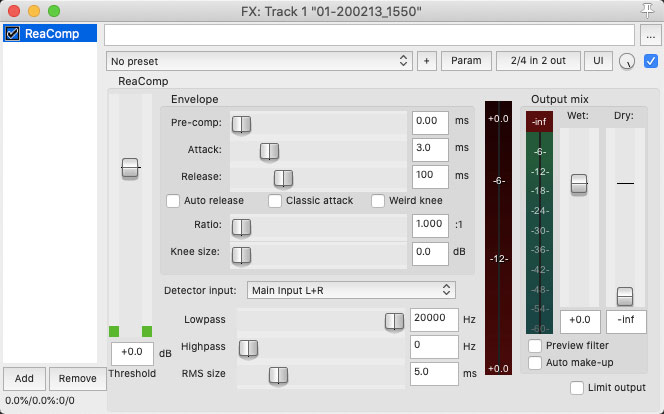
No bundled goodies: REAPERG doesn’t come with a massive library of virtual instruments, loops, or flashy “character” plugins. Its included ReaPlugs are incredible, low-CPU surgical tools (ReaEQ, ReaComp), but you’ll need to bring your own amp sims and drum samplers.
The “Customization Rabbit Hole”: Its greatest strength can be a weakness. It’s easy to spend more time tweaking your DAW setup than actually making music.
Notable Features & How-Tos
REAPER is the definition of a “power user’s DAW.” It doesn’t put all its best features on the surface. It shines when you take advantage of how flexible and customizable it is. The learning curve for these advanced features can be a little steep, but mastering them is what separates the beginners from the pros and unlocks a lightning-fast workflow. But first, make sure your gain staging is solid.
The Routing Matrix (Your Secret Weapon)
Why it matters for metal: This is REAPER’s true routing power, way beyond simple folders. The Routing Matrix is a grid that shows every track in your session and lets you send audio from any track to any other track with a single click. This makes complex metal mixing techniques incredibly simple.
- Parallel Processing: Instantly send a snare track to a separate “Snare Crush” bus without creating a “send” on the track itself.
- Side-chaining: Easily send your kick drum signal to the side-chain input of a compressor on your bass bus (e.g., to channels 3/4) just by clicking a box.
- Multi-Out Instruments: Visually manage all 16 stereo outputs from Superior Drummer 3 and route them to their own tracks in seconds.
- Example: How to create a Parallel “Snare Crush” Bus:
- Create your main “Snare Top” track.
- Create a new track and name it “Snare Crush”.
- Open the Routing Matrix (View > Routing Matrix, or Alt+R).
- Find the “Snare Top” track in the list on the left (the Sender).
- Find the “Snare Crush” track in the list on the top (the Receiver).
- Click in the empty box where they intersect. A “send” is instantly created.
- Done. The “Snare Top” audio is now being sent to the “Snare Crush” track. You can now put a compressor (like ReaComp) on the “Snare Crush” track and slam it, blending it in with your main snare. This is a classic move in mixing metal drums with parallel compression.

Dynamic Split + Stretch Markers (Drum Editing)
These two features combined create a workflow that is surgically precise and incredibly fast for editing drums, guitars, and bass. For anyone used to clunkier, multi-step processes in other DAWs, this is a game-changer.
What is Dynamic Split? Think of it as REAPER’s version of Beat Detective, but built directly into the item splitting function. It’s a powerful transient detector that you can use to slice audio. Its real power for metal is that when you group all your drum mics, you can tell it to slice all tracks based on the transients of just one track (like the snare top). This gives you sample-accurate, phase-coherent slices across your entire kit with one command. This is the key to getting a tight performance and is essential if you want to mix drums without using samples.
What are Stretch Markers? This is REAPER’s version of Elastic Audio (Pro Tools) or Flex Time (Logic). They are little markers you can drop directly onto an audio item at any transient (like a late guitar chug or a slightly dragging kick hit). You can then simply click and drag that one transient to snap it to the grid, and the audio on either side time-stretches intelligently to follow.. It’s an incredibly fast, “click-and-drag” way to tighten performances without the overhead of a whole separate plugin or edit window.
How-To (The ‘Beat Detective’ Method):
- Select all your multi-mic’d drum tracks (kick, snare, toms, overheads, rooms).
- Group them (press ‘G’). This is the most important step to keep them phase-coherent.
- Select just your “guide” track (usually the snare top).
- Go to the Action List and find Item: Dynamic split items….
- Set it to “Split items at transients” and “When transients are detected on” (choose your snare track).
- Select all the newly-sliced drum items (which are still grouped).
- Quantize them to the grid (e.g., using the ‘Q’ key or SWS quantize actions).
- Finally, with all items still selected, run the action “Fill gaps between selected items (sample-accurate)” to automatically create tiny crossfades and “heal” the edits.
👉 Want the full, in-depth guide? Check out our two-part masterclass:
The Stock Plugins Are Actually Great (The ReaPlugs Toolkit)
Let’s be real: The ReaPlugs look like they were designed in 1998, and in a world of fancy, photorealistic GUIs, they can be a bit of a turn-off. But here’s what you’re getting in that “boring” package: surgical precision and super low CPU load.
While other DAWs give you “character” plugins that emulate vintage gear (and eat your CPU), ReaPlugs are built for one thing: clean, efficient, mathematical sound shaping. ReaEQ is a transparent, unlimited-band EQ. ReaComp is one of the most flexible compressors out there, with powerful side-chaining and filtering options that many “prettier” plugins hide from you.
For a dense metal mix, this is critical. You can put a ReaGate and a ReaEQ on every single tom and cymbal track without ever thinking about your CPU. This is a workflow that would bring other DAWs to their knees, forcing you to freeze tracks or print your changes. In REAPER, you can stay flexible and keep tweaking until the last minute. They are the ultimate “utility” tools, and once you learn their power, you’ll see them as beautiful in their own way.
Bonus: You can use them in other applications like Adobe Premiere (just add them as third-party VSTs).
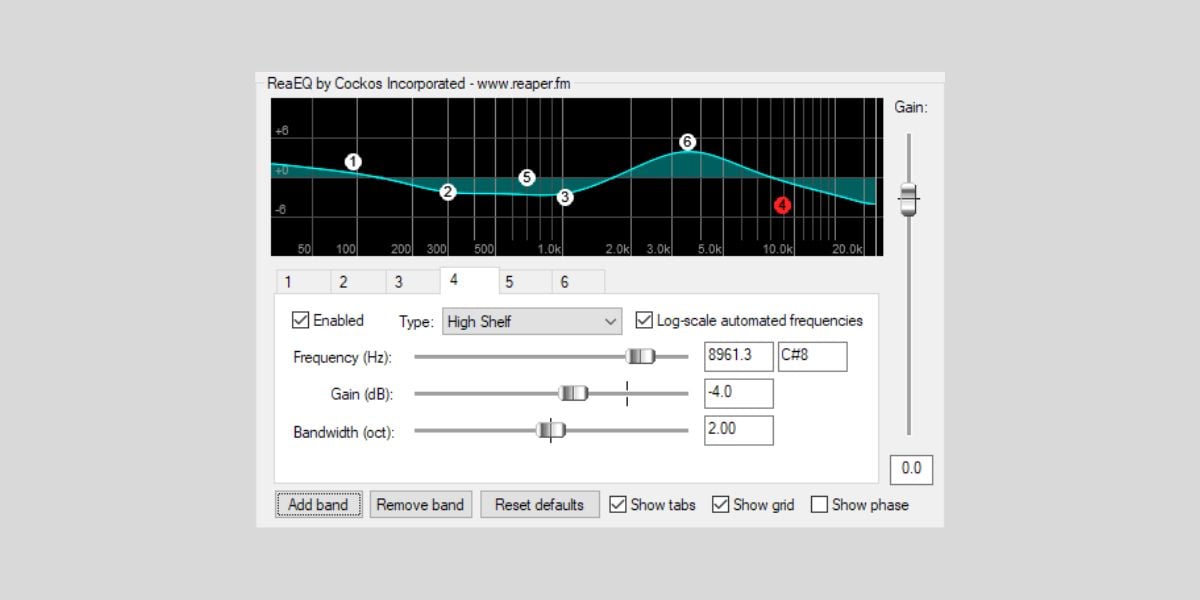
ReaEQ: Your surgical EQ Swiss Army knife. (And if you’re new to EQ, check out this quick start to better metal mixes).
- Use it for: Taming guitar fizz. High-gain guitars have nasty, harsh frequencies. Use ReaEQ with a narrow band to hunt down and cut those fizzy spots, usually between 6kHz and 10kHz.
- Use it for: Kick/Bass symbiosis. Carve a small pocket in the bass guitar track right where the kick beater’s “click” lives (a key part of how to mix a metal kick drum) (3-5kHz) to let the kick punch through.
- Hard Mode: Put a ReaEQ after a ReaGate on a tom track, then sidechain the EQ band from the tom’s audio before the gate. Now you have a gate that opens, and an EQ that only cuts annoying ring when the tom is actually hit.
ReaComp: The unsung hero of dynamics. (Learn all the basics of compression for metal here).
- Use it for: Classic kick/bass sidechaining. Put ReaComp on the bass track, create a send from the kick track to channels 3/4 of the bass track, and set ReaComp’s “Detector input” to “Auxiliary L+R”.
- Use it for: Taming palm mutes. Put ReaComp on the DI guitar track before the amp sim. Use a fast attack to catch the aggressive peaks of the palm mutes, giving your amp a more consistent signal to distort.
- Hard Mode: Create your own multi-band compressor. Put 3 ReaComps in a row. On the first, use the “Detector Input” filter to set a Low-pass at ~150Hz (now it’s a low-band comp). On the second, set a High-pass at ~3kHz (high-band comp). On the third, use both (mid-band comp). All this in one plugin with almost no CPU hit.
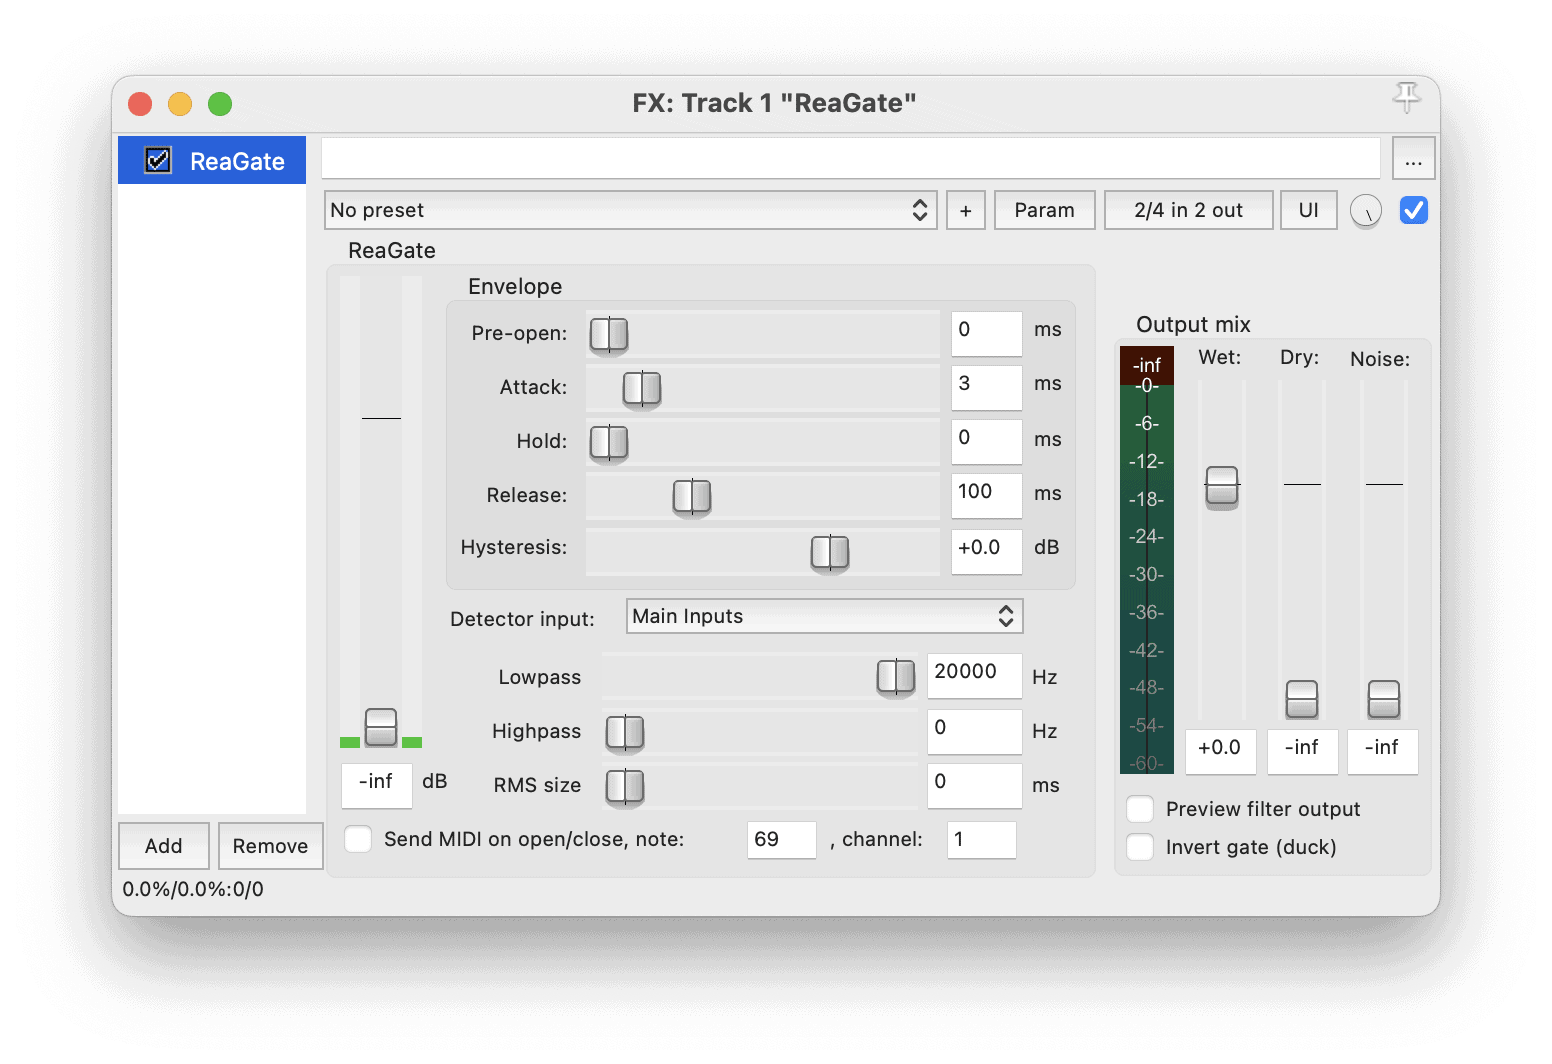
ReaGate: Reaper’s stock noise gate.
- Use it for: Tightening guitar chugs. Put ReaGate on the DI guitar track before the amp sim. Set the threshold carefully to cut all string hiss and noise between the notes, leaving only the aggressive, percussive “chugs”.
- Hard Mode (That’s actually easy in REAPER): “Surgical Sidechain Filtering.” The sidechain filter in ReaGate isn’t just a simple HPF/LPF—it’s a full parametric EQ. On your tom gate, you can boost the fundamental “thwack” of the tom (e.g., +10dB at 100Hz) and cut the cymbal frequencies (~4kHz). This makes the gate incredibly intelligent, opening only for the tom and ignoring everything else.
Custom Actions, SWS & ReaScript (REAPER’s “Superpower”)
This is what truly separates REAPER from every other DAW. No other platform comes close to this level of customization.
This is how you make REAPER truly yours. You stop working around your DAW’s limitations and start making the DAW work for you. Stop clicking the same 10 buttons 100 times a day. Automate it. This is how Reaper power users build workflows that are impossibly fast, setting up automations that do literally hours of work with one or two clicks. It’s almost like creating your own DAW (or the DAW version of Factorio).

But Reaper’s power is REALLY unlocked with SWS/S&M Extension. It’s a free, community-made add-on that massively expands the number of available actions and adds powerful new functionalities right out of the box (like snapshots, groove tools, and better project management). It’s considered an essential install for any serious REAPER user.
- Install These (required):
- SWS/S&M Extension: A free pack that adds thousands of new, powerful actions.
- ReaPack: A free package manager that lets you browse and install thousands of community-made scripts.
- Example Custom Action: Make a quad-tracked guitar bus with a single click
- Open the Action List (? key).
- Click “Custom Actions” > “New”.
- Drag these actions from the left list to the right:
- Item: Select all items in track
- Item: Duplicate selected items (add this 3 times)
- Track: Set pan for selected tracks to -1.0 (for track 1)
- Track: Set pan for selected tracks to 1.0 (for track 2)
- … (and so on for 75% L/R)
- Track: Insert new track (and select it)
- Track: Set new track as folder
- Save this action as “Make-Quad-Track GTRs”.
- Assign it to a hotkey. Now you can make a full quad-track bus with one button press.
Ecosystem & Compatibility
How nicely does REAPER play with the rest of the audio world and how robust is its community in terms of users, developers, content creators, etc?
Plugins
It’s a VST-based world. REAPER works perfectly with all the metal standards: Neural DSP, Toontrack (Superior Drummer), Slate Trigger, GetGood Drums, Soothe2, etc. It’s the perfect host to create wide metal guitars.
Project interchange
The hard truth: you’ll be exporting stems. Get good at using the Render Queue to batch-export all your tracks.
Extensions & scripts
The SWS Extension and ReaPack are essential. They add features like Snapshots (for A/B-ing mix settings) and Auto Color/Icon (for organizing huge sessions).
Themes
You can completely change the look. There are amazing user-made themes that perfectly mimic Pro Tools, Cubase, and Logic, which dramatically flattens the learning curve if you’re switching.

Communities
The REAPER community is one of its strongest assets. They are some of the most helpful and nerdy on the internet. A few of our faves:
- The Official Cockos Forum: The main hub. If you have a deep technical question or a bug, this is the place to go.
- /r/Reaper Subreddit: Great for beginners, sharing tips, and seeing what other people are working on.
- REAPER Users Group (Facebook): A very active and helpful Facebook group for more general discussion.
Reaper vs Other DAWs
Any major DAW can produce a world-class metal record. The choice is about workflow, price, and collaboration.
Pro Tools is the industry standard you’ll be forced to use in big studios. Cubase is pretty great at everything, and it’s hard to go wrong choosing it as your DAW. Logic is an insane all-in-one value for Mac users who also write a lot. Studio One is super-fast and modern “out of the box”. Ableton and FL Studio probably are technically options, but geared more toward electronic music than metal.
Reaper beats them all on price, CPU efficiency, and deep, “tinkerer-level” customization. It’s the ultimate DIY toolkit.
Full comparisons of Reaper vs other DAWs:
- Reaper vs Pro Tools
- Reaper vs Logic Pro
- Reaper vs Cubase
- Reaper vs Ableton
- Reaper vs FL Studio
- Reaper vs Bitwig
- Reaper vs Presonus Studio One
FAQs
Is REAPER free?
No, but many people think it is due to the generous trial (which honestly, a lot of people abuse… looking at you, “still evaluating” crew). It has a 60-day, fully-functional trial. After that, it trusts you to buy a license, which is $60 for most people.
How long is the evaluation period?
60 days. After that, the software continues to work 100% with all features, but it will show a 5-second reminder screen when you open it.
Does REAPER run natively on Apple Silicon?
Yep. And it’s incredibly efficient.
Does REAPER support Linux and Linux plugins?
Yes, it has native Linux builds, which is a huge deal for that community. Easily your best option for audio on Linux.
Which plugin formats does REAPER support (VST3/AU)?
It supports pretty much everything: VST, VST3, AU (macOS), DX (Windows), and its own lightweight JSFX format.
Is REAPER good for metal mixing?
It’s an absolute powerhouse for it. Its low CPU use, surgical editing tools, and flexible routing are practically built for the “more is more” production aesthetic of modern metal (which is a different process from mixing vs. mastering).
How do I move a project from another DAW into REAPER?
You…. basically can’t. You have to print stems, which means exporting every single track from your old DAW as a full-length, consolidated audio file (all starting at 0:00) and then dragging those new files into a blank REAPER project.
Conclusion: Is Reaper right for you?
If you are the kind of person that likes tinkering with things like Android, Linux, Plex servers, and so forth you’ll probably love Reaper. If you want something that just works right out of the box, it might not be for you.
But the bottom line is, stop arguing on forums and just download the trial. It’s the only way to know.
You’ll love REAPER if…
- You’re a DIY producer, engineer, and mixer working from a home studio.
- You love to tinker and build a workflow that is 100% yours.
- You run massive sessions with tons of plugins and are sick of your current DAW crashing.
- You’re on a budget but refuse to compromise on professional-grade audio tools.
You’ll probably hate REAPER if…
- You need to constantly send project files to commercial studios or collaborators who use Pro Tools.
- You want a “plug-and-play” experience with a huge library of included instruments and loops (go for Logic or Cubase).
- You get easily overwhelmed by too many options and just want the DAW to “guide” you.
And if you made it this far…. you should probably just go download the trial already! Enjoy, and let us know what you think of Reaper.