How To Create Lo-Fi Metal Vocals w/ The 0ms Delay Trick
Finn McKenty
you need that vocal to sound crushed, telephonic, and unsettling. You reach for your go-to distortion plugin or a bitcrusher, but it just sounds… digital. It’s too harsh, or it lacks that specific midrange “honk” you hear on your favorite records.
Before you go hunting for another boutique saturation plugin, check your delay folder.
There’s a classic trick that turns your analog-modeled delay into a powerful lo-fi coloring box. It’s one of the fastest ways to get a unique vocal texture that sits perfectly in a heavy mix, and it often sounds more organic than a dedicated distortion unit.
Here’s how to turn your delay into a saturation beast.
Why use a delay plugin vs standard saturation?
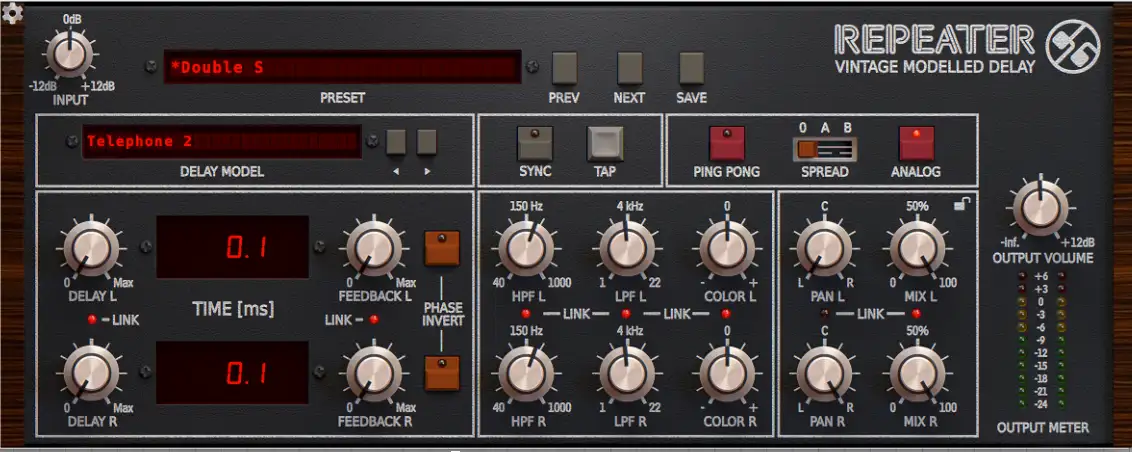
Most modern delay plugins, like the D16 Group Repeater or Soundtoys EchoBoy are meticulously modeling the circuitry of vintage hardware units—tape machines, bucket-brigade devices, and old digital rack units. It’s more than just “repeating the audio.”
To get those repeats to sound authentic, developers model the entire signal path, including the input drive, the unique EQ curves, the modulation/wow-and-flutter, and the compression characteristics of the original unit.
Usually, you only hear this coloration on the echoes. But if we remove the time element, we can force the dry signal through that modeled circuitry. You’re essentially using the plugin as a preamp or a filter bank rather than an echo chamber.
How to execute the “0ms Delay” Trick
This technique works best with “vintage” or “analog” style delays. A pristine digital delay won’t give you much character here.
Fire up a plugin like D16 Repeater on your vocal track (or an aux, though this works great as an insert for total destruction) and dial in these settings:
- Delay Time: Set this to 0 ms (or as low as the plugin allows). In the D16 Repeater shown above, you can get it down to 0.1 ms, which is effectively instant for our purposes.
- Feedback: Turn this all the way down to 0. We don’t want any regeneration; we just want the signal to pass through the processor once.
- Mix: Crank this to 100% Wet. This is crucial. If you leave dry signal in, you might introduce comb filtering or phasing because of the slight latency (even at 0.1 ms). By going 100% wet, you are replacing the clean vocal entirely with the processed, colored signal.
Finding the Flavor
Once you have the settings locked, the fun begins. Start flipping through the different delay models or algorithms.
If you’re using the D16 Repeater, try the “Telephone 2” model. This is an incredible shortcut for that band-passed, aggressive vocal sound often heard in metalcore verses or nu-metal bridges. The model inherently rolls off the low end (mud) and the high end (fizz), leaving you with a focused, gritty midrange that cuts right through a wall of guitars.
You can tweak the Color knobs to darken or brighten the tone, or drive the Input knob harder to push the modeled circuitry into saturation.
Why do this instead of EQ + Saturation?
You could theoretically recreate this sound by chaining a High Pass Filter, a Low Pass Filter, and a Saturator. But using a delay plugin offers a few distinct advantages:
- Unique Character: The EQ curves in these delay models are often weird and non-linear. They aren’t perfect 12dB/octave slopes; they have bumps and dips that add a specific “vibe” you can’t easily EQ.
- Modulation: Many tape delay models introduce subtle pitch warble or “wow.” When applied to a lead vocal with 0ms delay, this acts like a very subtle chorus or double-tracking effect, thickening the vocal without making it sound washy.
- Workflow: It’s fast. Flipping between a “Tape” model and a “Digital 42” model drastically changes the texture in one click, keeping you in the creative flow.
Next Steps
Next time you’re looking to dirty up a scream or make a clean vocal sound like it’s coming through a megaphone, don’t overthink the processing chain. Grab a delay, kill the time, and crank the mix.
If you want to see exactly how top-tier producers use creative tricks like this to mix bands like Periphery, Gojira, and Meshuggah, you need to check out Nail The Mix.
It’s the only place where you get the raw multi-tracks from real albums and watch the original producers mix them live, explaining every plugin choice and setting along the way. Stop guessing and start mixing like the pros.