A Guide to Neural Amp Modeler (NAM)
Nail The Mix Staff
Ever wished you could bottle the exact sound of your favorite amp, or even a complex chain of plugins, and recall it instantly? What if it was free and open-source? Enter Neural Amp Modeler (NAM), a seriously cool plugin that’s been turning heads in the music production community.
Think of it like having a Kemper-style profiler right in your DAW, allowing you to capture the soul of an amplifier – be it a real tube monster or your go-to plugin – and use it anywhere.
This isn’t a gimmick: it’s a powerful tool leveraging machine learning to get incredibly close to the source.
What Can Neural Amp Modeler Do?
Neural Amp Modeler is designed to grab the essence of anything with distortion, saturation, or distinct EQ characteristics. This makes it perfect for:
- Guitar and bass amps
- Distortion and overdrive pedals
- Preamp characteristics
- Even complex saturation chains from multiple plugins!
However, just like its hardware counterparts (think Kemper), NAM isn’t built to capture time-based effects. So, you can’t clone a delay pedal or a compressor directly. If you want to master how to use compression in your metal mixes, that’s a separate skill to develop.
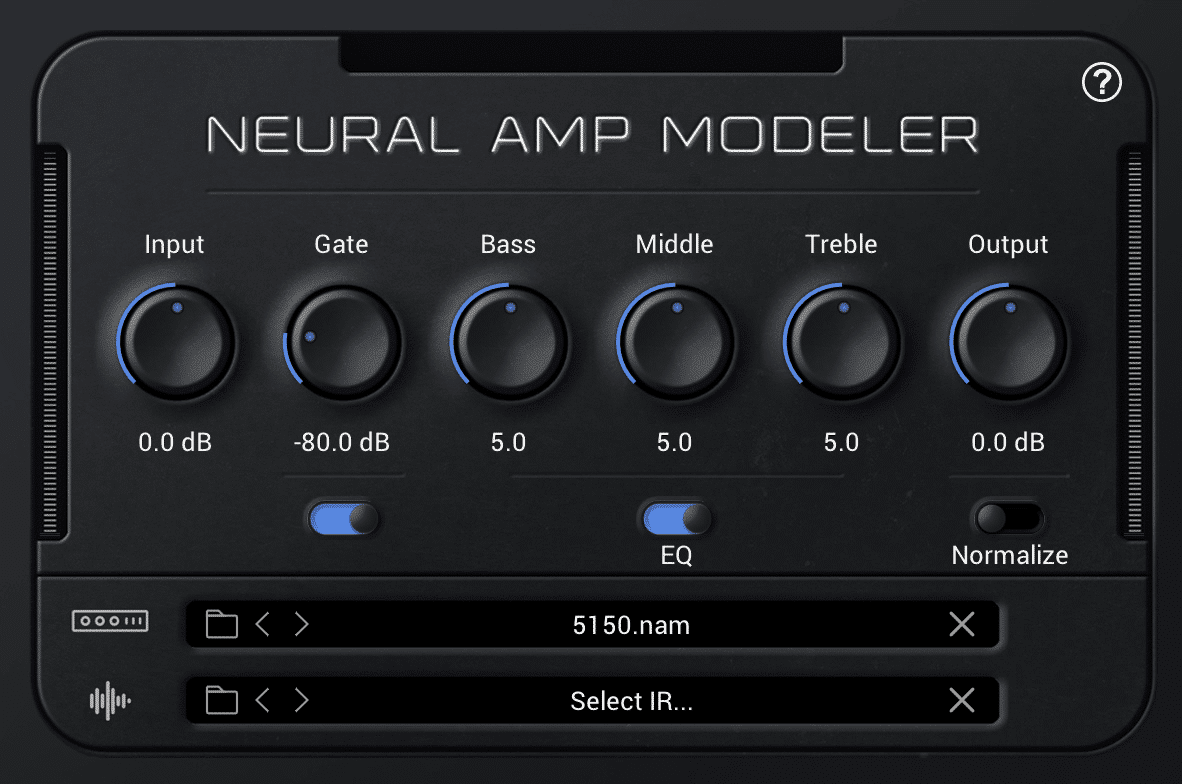
The NAM plugin itself is straightforward, offering:
- An input gate
- Input and Output volume controls
- A basic tone stack EQ for quick tweaks
- A “Normalize” function to help match levels between different models
- Model selection and an integrated IR (Impulse Response) loader
Getting Started: The NAM Workflow Overview
One of NAM’s biggest perks, aside from being free, is its flexibility. Unlike some hardware profilers that require everything to happen in one go, NAM lets you separate the capturing process from the training process. This means you can reamp your DI tracks and capture your amp’s output whenever you have studio time, then deal with the model training later when you have a moment.
While incredibly powerful, be aware that NAM is very much an open-source project. This can mean a slightly higher technical barrier to entry compared to off-the-shelf commercial software. You might find yourself navigating GitHub pages or using tools like Google Colab. But don’t let that scare you off – the results are worth it, and there’s a thriving community to help (just like Reaper).
The basic workflow involves:
- Capturing: Sending a special audio file through your amp (or plugin chain) and recording the output.
- Training: Feeding both the original and your recorded audio to the NAM training software (often via Google Colab) to create the
.nammodel file. - Using: Loading your new
.namfile into the NAM plugin in your DAW.
Step 1: Capturing Your Amp Tone for NAM
This is where the magic begins. You’re essentially “teaching” NAM what your amp sounds like.
Setting Up Your Source Tone
For the demonstration in the video, Dave Otero used the Neural DSP Archetype Plini plugin as the amp source. While you can absolutely use a real amp (mic’d up or through a load box), using a plugin in the box makes the routing straightforward for an example.
A key takeaway is that NAM currently excels at capturing amp-only tones. While it can model an amp and a cabinet together, you’ll generally get better and more flexible results by capturing just the amp head’s sound. This means if you’re using a real amp, you’ll want to tap the signal before the speaker cabinet, using a load box with a line out. If you’re using a plugin like Archetype Plini, you’d disable its internal cab emulation for the capture. You can then pair your NAM model with your favorite impulse responses later using NAM’s built-in IR loader, a separate IR plugin (like the GGD’s Cab Cali Oversized IR mentioned in the video), or even create your own impulse responses.
Important: Before capturing, strip your source tone down. Disable any built-in effects you don’t want modeled, especially time-based ones like delays, reverbs, or even compressors and gates if they aren’t integral to the core tone you’re trying to capture. For instance, Dave later realized a compressor and gate within Plini were affecting his model – less is more for a clean capture.
The Magic Training File
To capture a tone, you need a specific audio file provided by the NAM developers. You can find this on the main Neural Amp Modeler GitHub page. Look for the training file, often named something like V1.1.1.wav (the version might change, so always grab the latest recommended one for training).
This file sounds like a series of sweeps and noises – it’s designed to excite the amp across its full frequency and dynamic range. You’ll import this exact WAV file into a track in your DAW.
Processing and Exporting Your Amp Capture
Route the track with the V1.1.1.wav file through your target amp (or plugin chain). Record the output of your amp/plugin onto a new audio track.
Critical Export Settings
This is crucial for successful training. The audio file you export (your “amped” version) must adhere to these specs:
- File Format: WAV
- Sample Rate: 48kHz
- Bit Depth: 24-bit
- Channels: Mono
- Length: Exactly the same length, down to the sample, as the original
V1.1.1.wavtraining file. Some DAWs (Cubase was mentioned) can sometimes add a sample or two, so double-check this. Disabling auto-fades or ensuring your export range is precisely set to the original file’s length can help. - Volume: Ensure it’s not clipping. Unity gain is a good target. While NAM has normalization, a clean, unclipped signal is best.
You’ll need both the original V1.1.1.wav and your newly exported “amped” WAV file for the next step.
Step 2: Training Your Model with Google Colab
Once you have your two audio files (the original trainer and your amped version), it’s time to let the AI do its work. The easiest way for most people to do this is using Google Colab, a free service from Google that gives you access to GPU processing power – perfect for machine learning tasks.
Accessing and Setting Up Google Colab
The Neural Amp Modeler GitHub page usually provides a direct link to a pre-configured Google Colab notebook. This simplifies things immensely.
- Open the Colab link.
- The first step in the notebook is usually to “install NAM” into the Colab instance. This just involves clicking a “run” button on a code cell. It’ll download and set up the necessary software on Google’s temporary virtual machine.
Uploading Your Audio Files
Next, you’ll need to upload your two WAV files to the Colab environment:
- The original training file (e.g.,
V1.1.1.wav). It must keep this exact name. - Your amped recording. This file must be renamed to
output.wavfor the standard Colab script to find it. You can upload it with its descriptive name and then rename it within the Colab file browser.
There’s usually a file browser pane in Colab where you can upload and manage these.
Configuring Training Parameters
Before you hit “train,” you have a few options:
- Epochs: An epoch represents one full pass of the training data through the learning algorithm. More epochs generally mean a more accurate model, but with diminishing returns. Dave Otero mentions 100 epochs is a good starting point (taking about 15-20 minutes on Colab or a decent local GPU like a 1070). You might go up to 400-600 for complex tones, but beyond 1000 often yields little improvement.
- Architecture: This determines the complexity (and thus CPU usage) of the final NAM model.
- Standard: Most CPU intensive, potentially most accurate.
- Light: Less CPU, good for simpler models or low-power machines.
- Feather: Least CPU, ideal for very simple things like clean boosts.
Dave stuck with “Standard” for his test.
- Metadata: There’s usually a section to add metadata to your model (your name, amp name, etc.). This is great practice, especially if you plan to share your models.
Understanding the ESR (Error to Signal Ratio)
Once training starts, you’ll see progress updates. A key metric is the ESR (Error to Signal Ratio). This number indicates how closely the model’s output matches your target “amped” audio.
- Closer to 0 is better.
- An ESR around 0.1 is okay.
- An ESR like 0.04 (as Dave got after fixing an issue) is pretty good.
You can even see a graph comparing the target and prediction waveforms. The closer these lines are, the better the model. If your ESR is high, revisit your capture process – perhaps there was clipping, or an unwanted effect (like the compressor Dave found in his Plini settings) was active.
After training finishes, you’ll find your shiny new .nam model file in a folder (often lightning_logs/version_0/checkpoints/ or an “exported_models” folder) within the Colab environment. Download this file!
Step 3: Using Your Custom NAM Model in Your DAW
You’ve done the hard work, now for the fun part!
Loading Models and IRs
- Load the Neural Amp Modeler plugin on a DI guitar track in your DAW.
- Click the model selection area and navigate to your downloaded
.namfile. - If you captured an amp-only tone (recommended), you’ll now need an Impulse Response (IR) for the speaker cabinet. NAM has a built-in IR loader. Load your favorite cab IR here (like the GGD’s Cab Cali Oversized mentioned earlier, or any from your collection).
And just like that, you should be hearing your captured amp tone!
Comparing and Tweaking
Now A/B your NAM model against the original source (if it was a plugin) or a recording of the real amp. Dave Otero found his NAM capture of the Archetype Plini (a process similar to learning how to dial in a sick metal tone with Neural DSP) to be “pretty identical.”
You might need to:
- Adjust the input level into the NAM plugin.
- Use the output volume on NAM to match levels.
- Make slight tweaks with NAM’s built-in EQ, or add a separate EQ plugin for more surgical tone shaping. Dave added a touch of gain to his NAM model to match the original Plini’s perceived loudness and saturation.
Even with a “so-so” ESR of 0.0467, Dave found the results remarkably close and “completely usable.” The attack characteristic was often spot on.
Tips for Getting the Best NAM Models
Like any audio process, attention to detail pays off. Here are a few tips from Dave’s experience:
- Focus on Amp-Only Captures (For Now): As mentioned, NAM currently seems to provide the most consistent and high-quality results when modeling just the amplifier section, without the cabinet. Pair it with a good IR afterwards for maximum flexibility. The technology is always improving, so this might change!
- Clean Up Your Source Signal: This is a big one. Before you hit record on your “amped” track:
- Disable Time-Based Effects: Compressors, delays, reverbs in your source plugin or pedal chain can confuse the modeling process. NAM isn’t designed for them. Dave’s first model had a higher ESR because he’d left a compressor active in Archetype Plini. Disabling it significantly improved the result.
- Check for Hidden Processing: Be wary of built-in gates or other subtle effects in amp sims. Dave noted he should have also disabled the gate in Plini for an even purer capture. The simpler and more direct the signal path you’re trying to model, the better.
- Aim for the Lowest Possible ESR: While even an ESR of 0.04 can sound great, the closer you get to zero, the more faithful your model will be. Experiment with capture levels and ensure your source is pristine.
The NAM Community and Sharing Your Creations
One of the coolest things about Neural Amp Modeler is the vibrant community that’s sprung up around it. It’s open source, after all!
- Facebook Group: There’s a very active “Neural Amp Modeler” group on Facebook, with thousands of members sharing tips, troubleshooting, and, most importantly, their custom NAM models.
- Tonehunt.org: This website has quickly become the go-to repository for NAM models. Created by users, for users, you can find thousands of free models of various amps, pedals, and more. It’s a fantastic resource, especially if you want to try out NAM without immediately diving into training your own models. Dave mentions that, like Kemper profiles, there’s a skill to crafting excellent NAM models and avoiding the problem with modern metal guitar tone where many players sound generic. If you find a creator whose models you like on Tonehunt, check out their other work!
The project is spearheaded by Steve Atkinson, but with its open-source nature, many collaborators are constantly improving it.
Your Tone, Captured: What’s Next?
Neural Amp Modeler is a game-changer. The ability to capture incredibly accurate snapshots of your favorite amps and processing chains – for free – is genuinely exciting. Whether you’re archiving your unique hardware tones, sharing sounds with collaborators, or just exploring a universe of community-created models, NAM offers a powerful toolkit for the ongoing quest for killer guitar tone.
Yes, there’s a bit of a learning curve, especially if you’re new to open-source software or concepts like Google Colab. But as Dave Otero demonstrated, even fumbling through it can yield results that are “essentially indistinguishable” from the real deal. In the context of a full mix, where you’ll be EQing and processing guitars further, these subtle differences often become negligible.
But getting a great amp model is one thing… what about making it tear through a dense, professional metal mix? Imagine watching top-tier producers take raw DI tracks, choose amps (or modelers like these!), dial in the perfect IRs, sculpt with EQ, blend it all with crushing drums and bass, and make it sit perfectly… Nail The Mix lets you be a fly on the wall for exactly that. Every month, you get access to real multitracks from massive metal songs and watch the original producers mix them from scratch, explaining every decision.
Bring Me The Horizon on Nail The Mix
Dan Lancaster mixes "Doomed" Get the SessionIf you’re serious about taking your metal productions to the next level and want a deep dive into building modern metal sounds from the ground up, explore our comprehensive course: “Unlock Your Sound: Mixing Modern Metal Beyond Presets“. Give NAM a try, happy tone hunting, and join a community of like-minded producers at Nail The Mix to continue honing your craft!
More on Neural Amp Modeler: