Sidechain Everything to the Kick for Punchy Metal Mixes (ft. Volumes)
Nail The Mix Staff
Let’s be real. You’ve probably spent hours dialing in a kick drum tone that sounds absolutely massive in solo, only to have it completely disappear the second the wall of guitars and a pounding bassline come in. It’s one of the most common frustrations in mixing drums for modern metal. How do producers like Daniel Braunstein get the kick on a Volumes track to not just survive, but to punch through and drive the entire song?
The answer isn’t just about EQ or compression alone. It’s about a strategic use of sidechaining to create space and an aggressive, rhythmic pulse in the mix. We dove into how Daniel Braunstein tackled this exact problem in his Volumes mix, and the techniques are something you can apply to your sessions right now.
The Sidechain Philosophy: Making the Mix Move
Before we even touch a plugin, let’s talk about the goal. In dense rock and metal mixes, like those from cats like Zach Cervini, the sidechain is king. The idea is to make the entire mix—guitars, bass, synths—momentarily duck out of the way every time the kick drum hits. This isn’t a subtle wobble; it’s an aggressive, energetic pumping that creates a huge, powerful pocket for the drums.
Every single kick hit becomes an event that the rest of the mix reacts to. We’re going to build this effect layer by layer, starting with the classic kick vs. bass relationship.
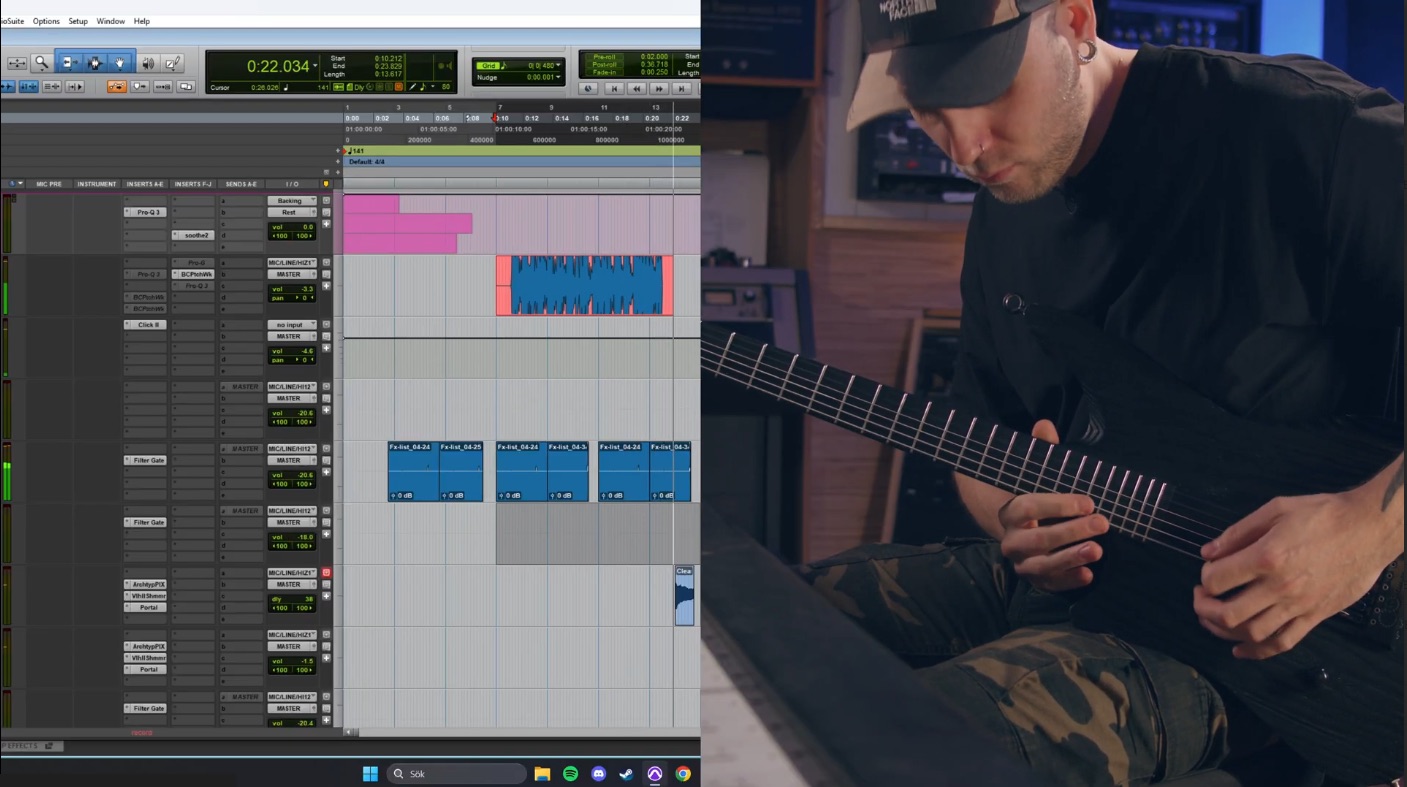
Building Your Kick Sidechain Foundation
First things first, you need a clean signal to trigger your compressors.
H3: Setting Up Your Send
In your DAW, create a dedicated bus—Daniel keeps one in his template called “Kick Side Chain.” The crucial step here is what you send to it. Don’t send your entire kick bus, especially if it has a lot of room mics or reverb on it. You want a short, tight, transient signal.
Sending from a direct kick mic (like a kick-in or a clean sample) gives the compressor a quick, precise trigger to react to. A long, roomy signal will confuse the compressor and result in a sloppy, undefined ducking effect.
H3: Taming the Bass Guitar
The first and most obvious place to apply sidechain is the bass.
- Grab a Compressor: Daniel’s go-to for this is the FabFilter Pro-C 2. Slap it on your bass track or bus.
- Set the Trigger: Set the compressor’s input to listen to your external sidechain, the “Kick Side Chain” bus you just created.
- Dial It In: Don’t be shy at first. Crank the settings so you can really hear what’s happening, then back it off.
- Style: The “Punch” style on the Pro-C 2 is perfect. It has a fast, aggressive response that gets in and gets out quickly.
- Gain Reduction: Aim for around 3-6dB of gain reduction. This is a solid starting point for an audible-but-not-overpowering effect.
- Release: Keep the release time very low. You want the bass to get out of the way of the kick’s attack and immediately snap back into place.
- Gain: Turn off any “Auto Gain” features. You want to control the level yourself.
This is a fundamental technique for any modern producer. Mastering the nuances of an audio compressor is what separates a good mix from a great one.
The Kick vs. Bass EQ Showdown
Sidechaining creates space in time, but you still have to learn how to mix low end and solve the inevitable frequency clash between kick and bass. They both live in the low end, so you have to make a choice: which one gets the subs, and which one gets the low-mids?
Daniel demonstrates this by trying both options. For a track like this, where the kick is tuned incredibly low, one approach clearly wins out.
H3: Carving a Home for Each Instrument
After analyzing the kick and bass, a major overlap was found around the 60-100Hz range. This is a common problem solved with careful kick drum EQ.
- Option 1 (The Failure): Give the bass the sub-bass and the kick the low-mids. This involved scooping the low-mids out of the bass (around 106Hz) and boosting its sub frequencies. The result? It just didn’t serve the song. The power felt misplaced.
- Option 2 (The Winner): Give the kick the sub-bass and the bass the low-mids. This is where the magic happened. By letting the kick dominate the deep sub frequencies and allowing the bass to carry the aggressive low-mid harmonics, the two instruments locked together perfectly. It’s okay for them to overlap a bit—that’s natural—but giving each a primary zone is key.
This kind of strategic problem-solving is at the heart of professional mixing. Mastering equalization is essential for achieving clarity in a heavy mix.
Expanding the Sidechain: Taking on Guitars & More
Don’t stop at the bass. To really make that kick punch, you need to apply the sidechain to almost everything else.
H3: Rhythm and Lead Guitars
Guitars are way less forgiving than bass when it comes to sidechaining. You can’t go as hard. Place the same compressor setup on your rhythm and lead guitar busses, but dial it back. Aim for 3dB of gain reduction or even less.
The goal isn’t to make the guitars pump wildly, but to create a subtle “envelope” that opens up just enough for the kick’s transient to cut through. The kick will feel louder and punchier without you even touching its fader.
H3: Production and Percussion
Apply the same logic to any production elements, synths, or auxiliary percussion like shakers. For these elements, the effect should be even more subtle. A dB or two of gain reduction is often plenty to create that cohesive, rhythmic movement across the entire mix. If you want to see exactly how Daniel dials this in across the entire production, you can watch him mix the full song from scratch in his Nail The Mix session.
The Snare Sidechain: A Different Approach for a Bigger Snare
The final piece of the puzzle is a separate sidechain for the snare. But here, the goal is different. Instead of clearing space for the snare’s initial crack, the goal is to accentuate its decay and the room sound.
H3: A New Bus, A New Goal
- Create a New Send: Make a new bus called “Snare SC.”
- Use a Direct Source: Just like the kick, send a signal from your most direct snare mic, like the snare top. A short, tight signal is what you need.
- Apply to Bass and Guitars: Drag your sidechain compressor (the Pro-C 2) onto the bass and guitar tracks, but this time, set the trigger to the new “Snare SC” bus. Important: This compressor should go after any other processing on the channel, especially other compressors.
H3: Adjusting Compressor Settings for Room
To let the snare’s room sound pop, you need to adjust your compressor settings:
- Lower the Attack: By slowing the attack time on the compressor, you’re not ducking the initial transient of the bass or guitar. Instead, the compressor engages slightly later, ducking the sustain of the instruments right when the snare’s roomy decay is supposed to ring out.
- Use a Softer Knee: Daniel switches from the “Punch” style to a more standard setting for a less aggressive response.
The result is that the mix gets out of the way of the snare’s ambience, making the snare feel bigger, deeper, and more three-dimensional without adding a single reverb.
Volumes on Nail The Mix
Dan Braunstein mixes "Bend"
Get the Session
These are the exact kinds of high-level, actionable techniques that turn a good mix into a professional one. Watching a pro like Daniel Braunstein apply these concepts, make decisions in real-time, and explain every move is an invaluable learning experience. You can see it all in his exclusive session on Nail The Mix.
If you’re ready to move beyond presets and learn how the pros really craft massive metal mixes, this is your next step. And if you want to apply these tricks for yourself, become a member of Nail The Mix to get the multitracks for this Volumes song and watch Daniel’s full 8-hour mixing session.
“`