How To Mix Metal Vocals That Cut Through Anything
Nail The Mix Staff
In modern metal, your vocals are fighting for their life. They’re up against a dense wall of low-tuned, quad-tracked guitars, inhumanly punchy drums, and a bass tone that could register on the Richter scale. If your vocal mix is weak, timid, or buried, the entire track falls apart. It doesn’t matter how sick the riffs are; a bad vocal mix kills the song.
The expectation for polished, professional production has never been higher. Gone are the days of dodgy-sounding demos. Now, even local bands are expected to deliver mixes that can stand up to giants like Spiritbox or Falling in Reverse.
The good news? You have all the tools you need to do it. The key isn’t some magic plugin; it’s about applying the right techniques in the right order to make your vocals punch, scream, and soar over the chaos. Let’s break down how to get a modern metal vocal that doesn’t just sit in the mix—it commands it.
The Foundation: Prep Work is Not Optional
Before you even touch an EQ or compressor, you need a clean, solid performance to work with. Rushing this step is like building a house on a shaky foundation.
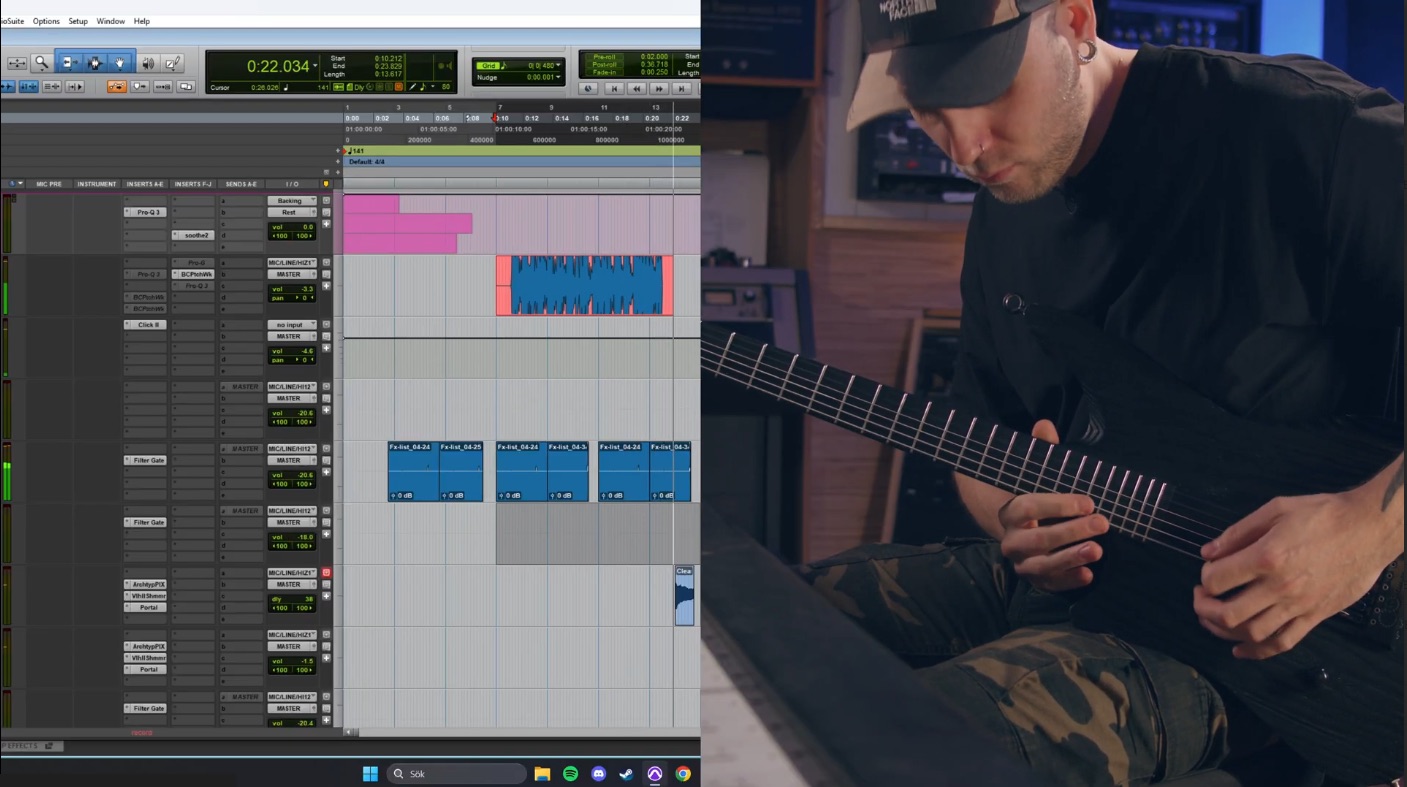
Editing and Comping: Building the Perfect Take
No vocalist, no matter how good, nails a perfect take in one go. That’s what comping is for.
- Comping: Listen through every take and create a “master take” by picking the best phrases, words, or even syllables from each. Be ruthless. Your goal is to assemble the single most powerful and in-tune performance possible. For a masterclass in bold vocal processing from legendary mixer Tom Lord-Alge—showing how heavy EQ, compression, and reverb combine to make a rock vocal command a dense mix—see his breakdown of the Angels & Airwaves vocal sound. For an extreme example of creative vocal augmentation—where custom-recorded gunshots are layered with extreme metal vocals to create something genuinely unique—see how Dave Otero built the iconic Archspire vocal intro. For an example of creative sound design and layered processing transforming a spoken-word section into a cinematic horror moment, see how Lawrence Mackrory built the Bloodbath zombie horror effect. For a detailed look at the specific plugins and techniques Dave Otero uses to make Allegaeon’s dynamic vocals cut through a brutal death metal arrangement, see his Allegaeon vocal mixing breakdown. For an interesting counterpart where the lead guitar takes the role of the vocalist entirely—and every mix decision is made to serve that melodic priority—see how Sam Guaiana treats Intervals’ lead guitar like a lead vocal.
- Cleaning: Go through your final comped track and clean it up. Cut out any stray noise between phrases. Use your DAW’s fade tool to smooth out edits so they’re completely seamless.
- Tuning & Timing: Use a tool like Melodyne or your DAW’s native pitch correction (like Logic’s Flex Pitch) to gently nudge any slightly off-key notes into place. Don’t go for the robotic T-Pain effect unless that’s a specific creative choice—for an example of leaning into robotic vocal processing, see how Daniel Braunstein uses MIDI-triggered vocoders and Saturn saturation on Spiritbox’s iconic hook. The goal is transparent correction. Use timing correction (like Flex Time or Elastic Audio) to tighten up any phrases that lag or rush the beat.
Gain Staging with Clip Gain
This is a pro move that makes your compressors work way more effectively. Instead of letting your compressor get slammed by a loud scream and then do nothing on a quiet whisper, level the track out manually first. Go through the vocal track and use clip gain (or item volume in Reaper) to turn down the loudest parts and turn up the quietest ones. Your waveform should look more like a consistent “sausage” than a spiky mountain range. Now your compressors can work on adding punch and character instead of just acting as a runaway volume knob. For a look at how Carson Slovak and Grant McFarland commit to aggressive hardware compression on the way into the DAW, see ERRA’s vocal tracking chain and philosophy.
Carving Space with Subtractive EQ
Your biggest enemy is frequency masking. Your vocals and guitars are fighting for the same midrange territory. Before you boost anything, you need to cut the mud and create a pocket for the vocal to live in.
The High-Pass Filter: Your First Move
This is non-negotiable. Slap an EQ on your vocal track and engage a high-pass filter (HPF). This removes all the useless low-end rumble, mic stand vibrations, and plosives that just add mud and clash with the bass and kick drum.
- Setting: For aggressive male screams, start around 100-150Hz. For higher-pitched vocals or cleans, you might go slightly lower, maybe 80-120Hz. Sweep it up until you hear the vocal start to sound thin, then back it off just a bit.
Surgical Cuts for Clarity
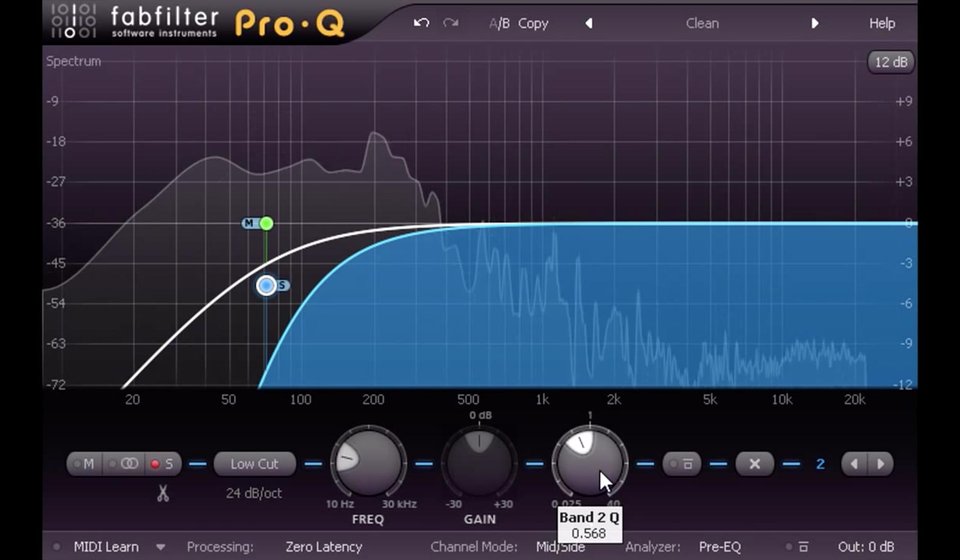
Now it’s time to get surgical. Use a high-quality EQ plugin like the FabFilter Pro-Q 3 and hunt for problem frequencies with a narrow Q (bandwidth).
- Boxiness/Mud (300-500Hz): A cut in this area can often clean up a vocal that sounds like it was recorded in a cardboard box.
- Nasal Honk (~1kHz): If the vocal sounds overly nasal, a small dip here can work wonders.
- Harshness/Sibilance (4-8kHz): This is a critical area. That harsh, fizzy sound on “S” and “T” sounds can be painful. Use a de-esser, or even better, the dynamic EQ function in Pro-Q 3, to automatically dip these frequencies only when they get too loud. A dedicated tool like Oeksound Soothe2 is an absolute game-changer for taming harshness without making the vocal sound dark.
By cutting these problem areas first, you’ve already made the vocal sound clearer and more professional without boosting a single frequency. For a deeper dive into EQ strategies, check out our guide on EQ for modern metal.
Punch and Presence: The Art of Compression
Compression is what gives a vocal that “in-your-face,” consistent sound that stays present from the first note to the last. One compressor usually won’t cut it. Try using two in a series.
Serial Compression: The 1-2 Punch
The idea here is that each compressor does a little bit of work, which sounds way more transparent and powerful than one compressor doing a lot of heavy lifting.
- Compressor #1 (The Peak Tamer): Use a fast FET-style compressor, like a UAD 1176 emulation or the Slate Digital FG-116. Set a fast attack and fast release with a high ratio (4:1 or 8:1). The goal is to just catch the loudest peaks and shave them off, aiming for only 2-3dB of gain reduction on the absolute loudest parts. This evens out the performance.
- Compressor #2 (The Leveler): Follow it up with a slower, smoother Opto-style compressor, like a Teletronix LA-2A emulation (e.g., Waves CLA-2A). This compressor has a more gentle, musical response. Its job is to provide the overall glue and consistent level, aiming for another 2-4dB of steady gain reduction.
This two-stage approach gives you tight dynamic control without crushing the life out of the performance. Want to master compression? We’ve got you covered with our metal compression secrets. For a real-world example of hardware and plugin compression working together on screams, see how Andrew Wade chains a U87, Empirical Labs Stressor, and serial plugin compression on Wage War. For a look at how Logan Mader applies this same serial compression philosophy on Gojira’s vocals—using a CLA-3A for smooth leveling followed by a second compressor for punch—see his Gojira vocal mixing breakdown. For a look at how Josh Schroeder pushed a Neve preamp and Distressor into the red to capture an ultra-consistent death metal vocal for Signs Of The Swarm, this breakdown is a must-read.
Adding Aggression and Character with Saturation
Now that the vocal is clean and controlled, it’s time to add some dirt back in—but in a controlled way. Saturation adds harmonic content that helps the vocal cut through the mix, especially on smaller speakers like phones and earbuds.
Parallel Distortion: The Secret Weapon for Aggression
This is a classic trick for making vocals sound huge and aggressive.
- Set Up an Aux/Bus Track: Send your main vocal track to a new aux track.
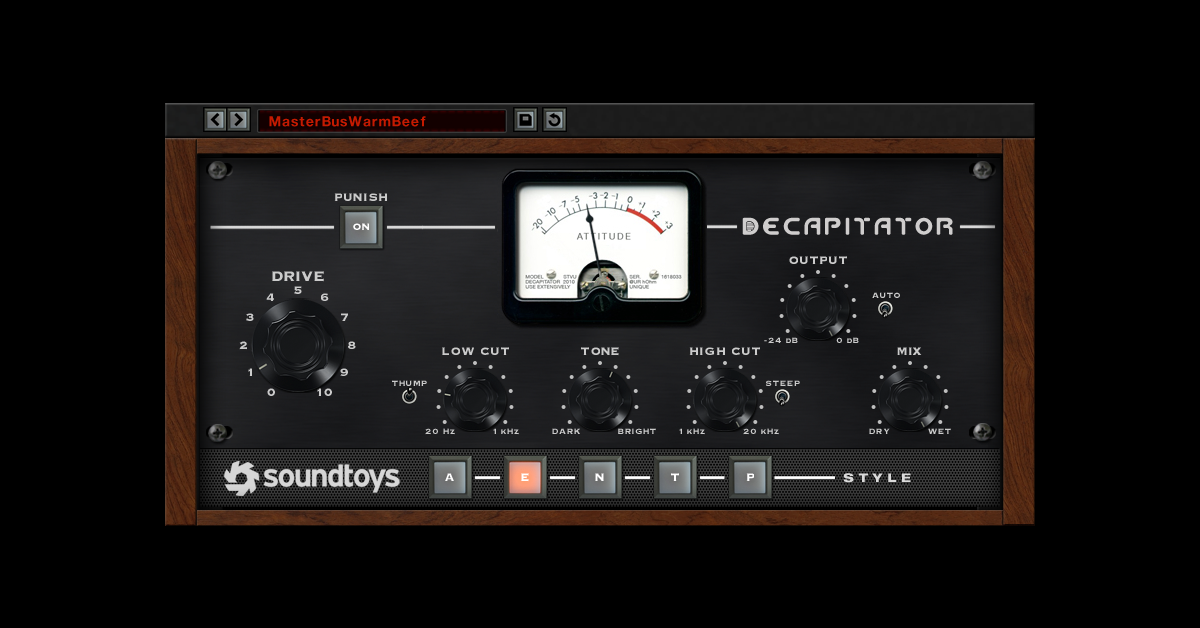
- Obliterate the Aux Track: On this new track, add a heavy distortion or amp sim plugin. A SansAmp PSA-1 emulation is a classic choice, but try a Neural DSP plugin or the Soundtoys Decapitator on the “Punish” setting. Go nuts. For a twist on this approach, see how Machine uses Decapitator as a parallel low-end thickener on Lamb of God’s vocals—treating distortion as EQ rather than just aggression.
- Filter It: After the distortion, add an EQ. Aggressively high-pass it up to around 500-800Hz and low-pass it down to around 4-5kHz. You don’t want the boomy lows or fizzy highs of the distortion, just the crunchy, angry midrange.
- Blend to Taste: Push the fader of this distorted aux track up underneath your main clean vocal. Even blended in very quietly, it will add a layer of aggression and bite that makes the vocal feel more powerful without sounding overtly distorted. For a creative twist on this concept, see how David Castillo uses distortion and filtering to craft a telephone vocal effect on Decapitated.
Creating Depth and Space with Effects
Modern metal mixes often use effects subtly to create a sense of space and polish without turning everything into a muddy wash.
Delays for Excitement
Instead of having a delay running through the whole song, automate it to “throw” on specific words.
- The Delay Throw: Find the last word of a key phrase. Automate the send to a delay track so it only turns on for that one word. Use a stereo 1/4 or 1/8th note delay (Soundtoys EchoBoy is king here). The delay will echo in the space after the phrase, adding excitement and depth without cluttering the mix. For an advanced parallel delay approach, see how Devin Townsend uses asymmetrical stereo delays with aggressive EQ carving to add atmosphere without mud.
Reverbs for Depth
Huge, long reverbs are a recipe for mud in a dense metal mix. Go for short, tight reverbs that give a sense of space, not a cathedral. That said, the approach should vary by vocal style—for a masterclass in this, see how Henrik Udd uses drastically different reverb treatments for Architects’ screams vs. cleans, plus advanced reverb chaining for shimmer effects. To understand how Udd creates the guitar context those vocals sit in—using unconventional saturation, multiband compression, and tight panning—see the Architects guitar tone breakdown.
- Choose Wisely: A plate reverb (like Valhalla VintageVerb) or a short room/chamber program works great. For a comprehensive look at layering multiple reverbs for different purposes, see how Henrik Udd stacks Revibe, Valhalla Room, Shimmer, and Blackhole to craft Dayseeker’s vocal depth.
- EQ Your Reverb: Put an EQ on your reverb return track. High-pass it up to 400Hz or even higher to cut out low-end mud, and low-pass it to tame any sibilant splashiness.
- Pro-Tip: Sidechaining: For ultimate clarity, sidechain the reverb to the lead vocal. This means the reverb’s volume ducks down whenever the vocalist is singing and swells back up in the gaps between phrases. It’s the best of both worlds: you get the space without sacrificing vocal clarity.
The Final Polish: Automation is Everything
Your mix isn’t done until you automate. This is what separates a good mix from a great one. Even after all your processing, some words and phrases will get lost.
- Ride the Fader: Go through the song line by line and automate the main vocal fader. Nudge it up 1-2dB on words that need more impact and pull it down slightly on parts that are too aggressive. Your goal is to make every single lyric intelligible and impactful.
- Automate Effects: Don’t leave your effects static. Automate the delay sends to be louder in choruses, or automate an EQ boost to give a certain scream more bite. This adds dynamics and keeps the mix exciting from start to finish. For a killer example of this in action, see how Taylor Larson uses dynamic vocal FX automation on Asking Alexandria. For a masterclass in managing vocal density across song sections, see how Josh Schroeder uses layering, panning automation, and multiband compression on Lorna Shore’s vocals.
Want to See How The Pros Do It?
These techniques are the building blocks for a massive, modern metal vocal sound. Applying them will instantly level up your mixes. For a look at how these techniques scale to dense, layered vocal productions, see how Buster Odeholm stacks and processes multiple vocal layers alongside electronic elements on Allt. For an equally challenging scenario—managing pre-printed vocal effects, screams, and synth layers in a dense metalcore arrangement—see the Asking Alexandria synth and vocal mixing breakdown. For a symphonic metal perspective on layering orchestral strings alongside heavy vocals and guitars, see how Fleshgod Apocalypse’s strings are humanized and EQed to sit inside a metal production.
Dance Gavin Dance on Nail The Mix
Kris Crummett mixes "Young Robot"
Get the Session
But imagine watching a producer like Will Putney or Joey Sturgis apply these concepts to a real session from a band like Knocked Loose or Gojira. Seeing why they choose a specific compressor, how they dial in that parallel distortion, and where they automate the fader is a complete game-changer.
At Nail The Mix, we give you a front-row seat. Every month, you get the actual multitracks from a major metal song and watch the original producer mix it from scratch, explaining every single decision along the way. If you’re ready to stop guessing and start learning the techniques the pros use every day, it’s time to unlock your sound and see what NTM is all about.