
How to gate a snare drum
Nail The Mix Staff
Let’s face it, getting a snare drum to punch through a dense metal mix without a wash of cymbal bleed is one of audio engineering’s eternal battles. You crank up that top-end EQ for that satisfying crack, and suddenly your hi-hats and crashes are fighting for space. Fear not, because taming that bleed is totally achievable. We’re diving into three distinct snare gating techniques used by pro mixers, leveraging powerful plugins like FabFilter Pro-MB, clever stock plugin setups, and the surgical precision of Oeksound Spiff. While we focus on audio-based triggers, another powerful method involves using MIDI key spikes to precisely trigger your gates.
Technique 1: High-Frequency Gating with FabFilter Pro-MB
This first technique is a lifesaver, especially when you’ve EQ’d your snare top to be nice and bright. The problem? That brightness often comes from boosting high frequencies, which, you guessed it, also boosts cymbal bleed. One popular solution involves using a modified short-body SM57 during tracking to minimize bleed from the get-go, but even then, more control is often needed.
The Problem: Bright Snares vs. Cymbal Bleed
When you push those higher frequencies on your snare top track – maybe with something like an API 550B on the way in or a plugin equivalent – you get that awesome snap and air. But, this inevitably brings up the level of any cymbal spill captured by the snare mic. Standard gating can sometimes sound unnatural or cut off the snare’s decay.
The Solution: Gating Only the Highs
Enter FabFilter Pro-MB. While it’s a multi-band compressor, its “Expand” mode turns it into a powerful frequency-conscious gate. The idea is to gate only the high frequencies of the snare top track. The gate opens for the full frequency smack of the snare hit, then quickly closes down on just the high-end between hits, leaving the snare’s body intact while silencing the cymbals.
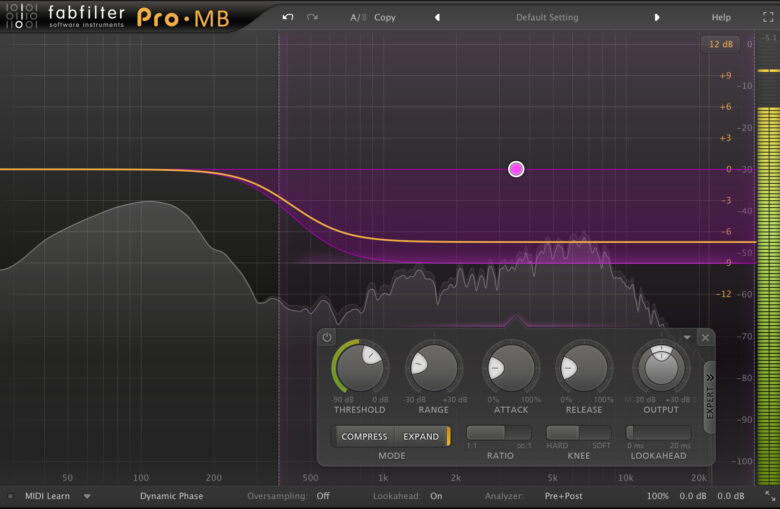
Setting Up FabFilter Pro-MB for Snare Gating
Dialing this in with Pro-MB is a bit of a technical exercise, but the results are worth it:
- Mode: Switch from the default “Compress” to “Expand” mode for the band you create over the high frequencies. This is crucial; you want to increase dynamic range (gating), not reduce it.
- Frequency Range: Create a band covering the problematic high frequencies. The gate itself will be triggered by the snare’s main energy, typically set to look at a range like 180Hz up to around 1.5kHz.
- Attack: Set this as fast as possible. You want the full high-frequency content the instant the snare hits.
- Release: A very fast release is key. As soon as the initial transient passes, you want those highs to duck, taking the cymbal bleed with them.
- Ratio: This controls how aggressively the high-end is attenuated between hits. Experiment to find what sounds most natural.
- Lookahead: A tiny bit of lookahead (e.g., 1-2ms) helps the gate open precisely on the transient, preventing any loss of initial punch.
- Threshold: Adjust the threshold so it’s triggered consistently by snare hits but allows the high frequencies to be fully reduced between those hits. You’ll see the signal level light up around the threshold control; set it near the top of the snare hits.
This move alone can be a game-changer for your snare sound, allowing for aggressive EQ without overwhelming bleed. For more foundational knowledge on EQ, check out these EQ Strategies for Mixing Modern Metal. Since expanders are a form of dynamics control, you might also find our Metal Compression Secrets insightful.
Don’t Forget the Snare Bottom!
A critical part of this technique is that this high-frequency gating is typically applied only to the snare top mic. Your snare bottom mic, capturing the sizzle of the wires, remains unprocessed by this specific Pro-MB setup. This means the sustain and natural top-end of the snare wires will still be present. Blend the snare bottom track with the processed snare top, and you’ll often find the processing becomes imperceptible, giving you a clean yet natural snare, helping to solve the problem with modern metal drums that can often sound robotic.
Adding a Standard Gate for Extra Polish
After the Pro-MB, you might still want a traditional gate on the snare top track for a bit more clean-up. Try a gate with a moderate range (e.g., cutting by about 13dB) and a shallow ratio. This allows sounds to fall off more naturally in volume rather than being abruptly cut, making the gating less obvious.

Technique 2: Stock Plugin Phase Cancellation Gate
No fancy third-party plugins? No problem! This next technique uses stock DAW plugins to achieve a similar bleed-reduction effect through clever phase cancellation.
The Concept: Using Phase to Your Advantage
The core idea here is to duplicate your snare track. On the duplicate, you’ll process it to isolate the bleed, flip its phase, and then use a compressor to duck this phase-flipped signal whenever the main snare hits. When the snare hits, the ducking stops the phase cancellation of the desired high frequencies, letting them pop through.
Step-by-Step: Building the Phase Cancellation Gate
- Get Your Snare Sound: First, EQ and compress your primary snare track to taste. Get it bright and punchy.
- Duplicate the Track: Create an exact copy of your processed snare track.
- Process the Duplicate:
- Compressor (First in Chain): Insert a stock compressor. Set the attack and release times as fast as they’ll go and the ratio as high as it will go (effectively turning it into a limiter).
- EQ (After Compressor and any copied EQs): Add an EQ and apply a high-pass filter, starting around 700Hz or so. You’re trying to isolate the cymbal frequencies.
- Flip the Phase: Insert a utility plugin that can flip the phase (polarity) of the duplicate track 180 degrees.
- Blend and Listen: Now, play both the original snare track and the phase-flipped duplicate track together. The phase-flipped, high-passed signal on the duplicate will attempt to cancel out the high frequencies on the original track. However, because of the aggressive compressor on the duplicate, every time the snare hits, the duplicate track’s level will be momentarily crushed, reducing its ability to phase cancel. This allows the original snare’s top end to shine through briefly during the hit.
Fine-Tuning and Committing
The volume relationship between the original track and the phase-flipped duplicate is crucial. Adjust the fader of the duplicate track to control the amount of high-frequency/cymbal reduction. You can make the effect more subtle or more aggressive. Once you’re happy, it’s a good idea to create a bus, send both snare tracks to it, and print the combined result to a new audio track. This commits the sound and saves CPU. (You might need to pull down the level of the bus slightly, as combining two hot tracks can lead to clipping.)
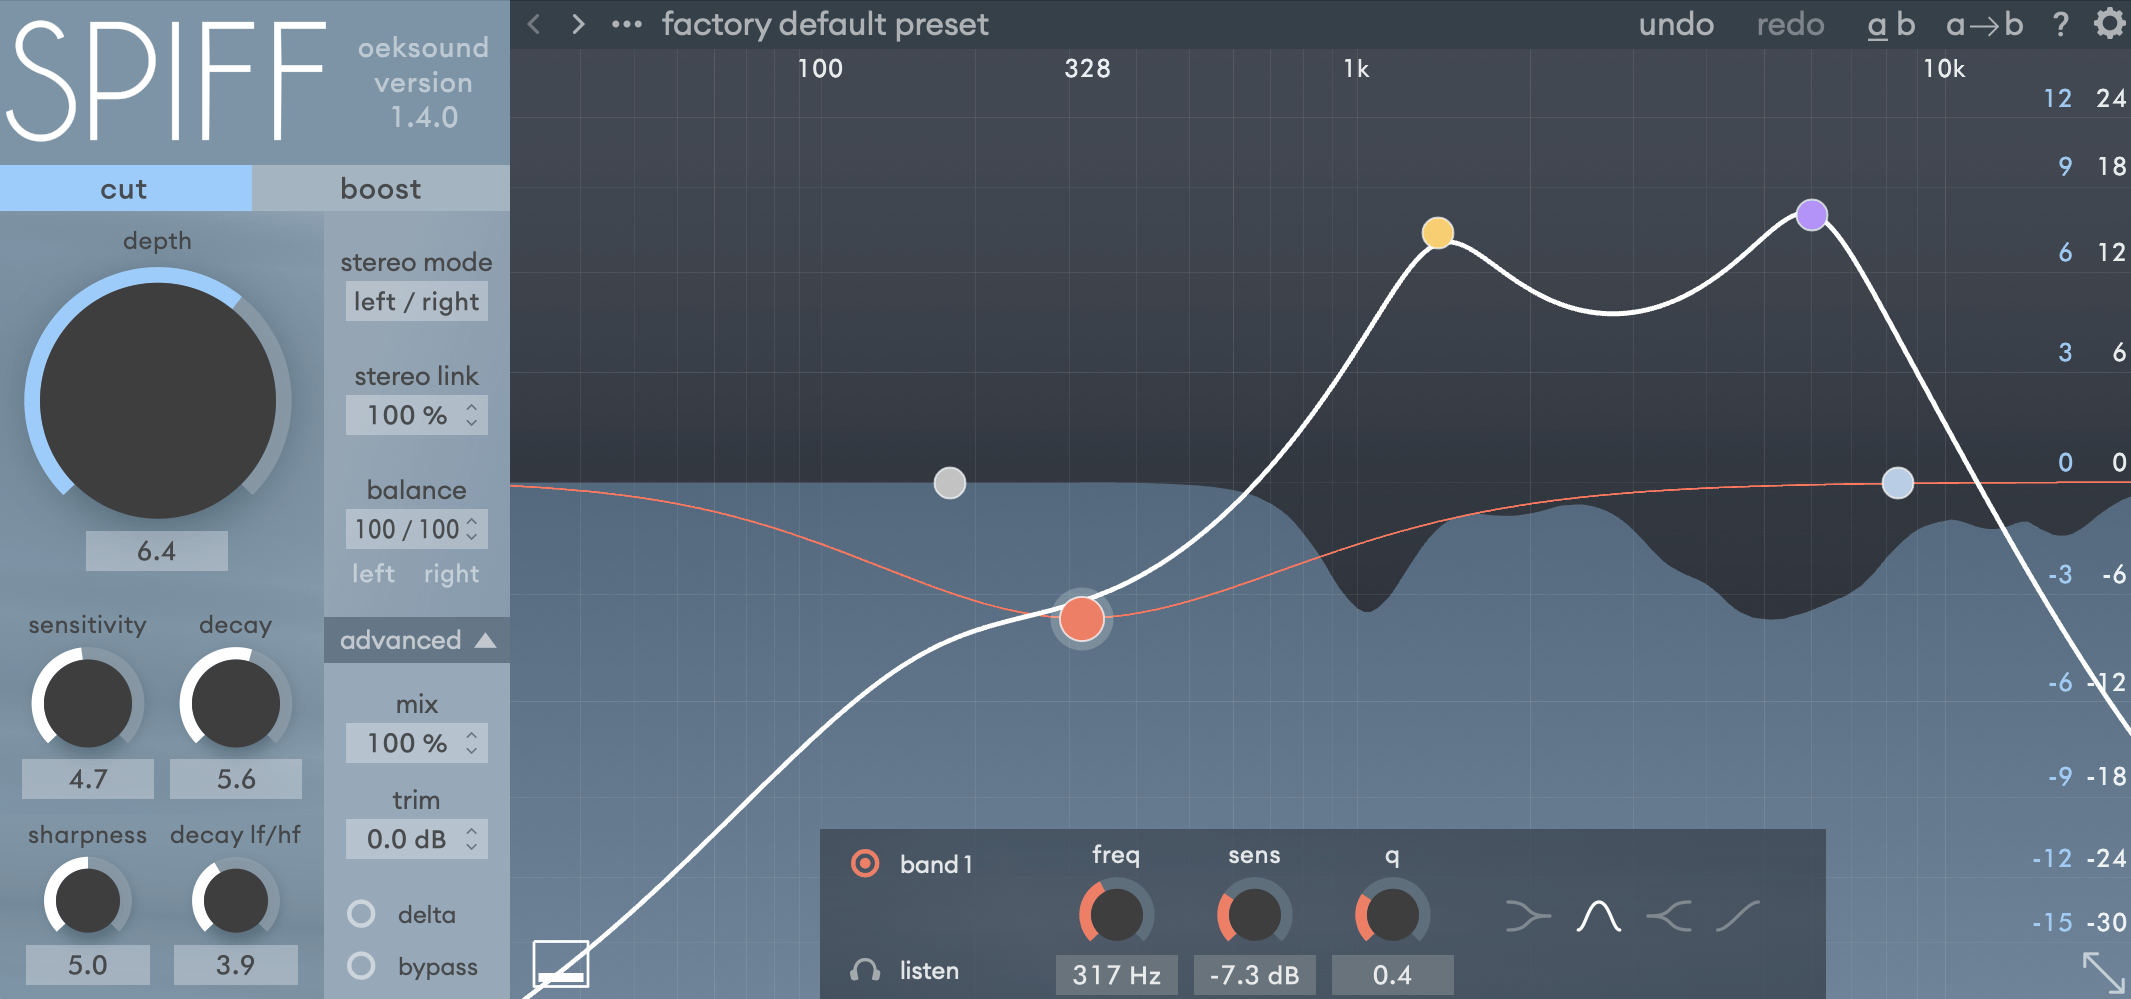
Technique 3: Advanced Bleed Reduction with Oeksound Spiff
For those times when you need to get really aggressive with bleed reduction on a heavily processed snare, this third technique, often involving Oeksound Spiff, comes into play. This is for when the snare is being absolutely smashed, and every bit of bleed needs to be dealt with.
For When You Need Extreme Processing
Imagine a snare sound that’s gone through the wringer: multiple EQs, heavy compression, maybe even distortion. This kind of “stop at nothing” processing can make bleed a nightmare.
The Spiff Parallel Bleed Trick
This advanced method often starts with some initial cleanup, like using Oeksound Soothe to tame harsh cymbal resonances. Then, after various EQ moves (boosting highs, cutting mids, carving out ringing), the core of this specific bleed trick involves Oeksound Spiff in a parallel configuration:
- Parallel Processing Setup: Use a plugin chainer or a parallel send/return setup.
- Inside the Parallel Chain:
- Oeksound Spiff (Cut Transients): Set Spiff to “Cut” mode and adjust it to aggressively demolish the transients of the cymbal bleed. You’re focusing Spiff on reacting to and cutting the sharp attacks of the cymbals.
- Filter (High-Pass): After Spiff, insert an EQ with a high-pass filter. This ensures the processing is focused only on the high-frequency cymbal bleed and doesn’t mess with the snare’s low-end or desired ring.
- Flip Phase: Finally, flip the phase of this parallel processed signal.
- Blend: When blended back with the original snare, this phase-flipped, transient-cut, high-passed signal will specifically cancel out a significant amount of the targeted cymbal bleed. The result can be a dramatic reduction in cymbal hash, even making the overall snare sound quieter initially, but much cleaner.
Layering Gates and Re-Adding Attack
After such surgical bleed removal, the snare might still benefit from more traditional gating. Sometimes, two gates are used: one for general shaping and a second with a deeper range setting to ensure absolute silence between hits when needed.
Ironically, after aggressively cutting transients to remove bleed, you might need to add some snap back to the snare itself. Oeksound Spiff can be used again, this time in its “Boost” or “Add” mode, to emphasize the snare’s attack, making it clicky and defined. This might be followed by distortion to further shape the heavily processed snare sound. Of course, if the original snare is beyond saving, you might explore drum sample replacement as another option.
Why Master Snare Gating?
These techniques aren’t just about showing off fancy plugin tricks. A clean, punchy snare, along with a powerful kick, is the backbone of most modern metal mixes. Effectively controlling cymbal bleed means you can:
- EQ your snare for maximum impact without making cymbals harsh.
- Compress your snare more aggressively without bringing up a wash of noise.
- Create space and clarity in your mix, allowing other elements to shine.
- Achieve a professional, polished drum sound that stands up to commercial releases.
Learning these kinds of advanced techniques is exactly what we focus on at Nail The Mix. Imagine seeing the pros who mixed your favorite albums implement these strategies in real-time, explaining every decision. If you’re ready to Unlock Your Sound: Mixing Modern Metal Beyond Presets, these are the kinds of details that make all the difference.
These three snare gating approaches offer a range of solutions, from subtle high-frequency control with FabFilter Pro-MB to clever stock plugin maneuvers and the deep surgical power of Oeksound Spiff. Experiment with them, understand why they work, and you’ll be well on your way to conquering snare bleed and achieving truly impactful metal drum mixes.
Gojira on Nail The Mix
Logan Mader mixes "Toxic Garbage Island"
Get the Session
Want to see these techniques and countless others applied in real-world mixing sessions by chart-topping producers? At Nail The Mix, you get monthly access to multitracks from massive bands and watch the original producers mix them from scratch. It’s the ultimate way to elevate your metal production skills. Join the Nail The Mix community and start transforming your mixes today!